
In the digital age, screenshots have become an indispensable tool for communication, documentation, and problem-solving. Whether you’re sharing a funny meme with friends, capturing important information for work, or troubleshooting an issue with tech support, knowing how to take a screenshot on your MacBook is a fundamental skill. In this comprehensive guide, we’ll explore the various methods available for capturing screenshots on your MacBook, as well as tips and tricks for maximizing their utility.
Understanding the Basics
What is a Screenshot?
Before diving into the specifics of capturing screenshots on your MacBook, let’s start with the basics. A screenshot, also known as a screen capture or screen grab, is essentially a digital image of whatever is currently being displayed on your computer screen. It’s a way to capture a moment in time, preserving what you see on your screen for future reference or sharing.
Why Take Screenshots?
The reasons for taking screenshots are as varied as the tasks we perform on our computers. Here are just a few common scenarios where screenshots come in handy:
- Sharing Information: Need to share a webpage, error message, or document with someone else? A screenshot makes it easy to capture exactly what you’re seeing on your screen and share it via email, messaging apps, or social media.
- Documentation: Whether you’re troubleshooting a technical issue or creating a user manual, screenshots can be invaluable for documenting steps, settings, or error messages.
- Reference: Ever come across a useful article, recipe, or piece of information online and wanted to save it for later? Taking a screenshot ensures that you have a visual record that you can refer back to whenever you need it.
- Creative Expression: Screenshots aren’t just practical—they can also be artistic! Some people use screenshots as the basis for digital art, collages, or memes, adding their own creative flair to captured images.
Methods for Capturing Screenshots on Your MacBook
Now that we’ve covered the why, let’s explore the how. There are several methods available for capturing screenshots on a MacBook, each with its own advantages and use cases. We’ll walk through each method step-by-step, so you can choose the one that best suits your needs.
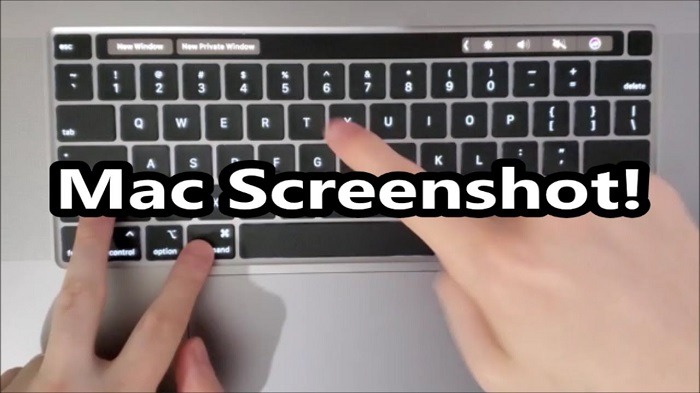
Using Keyboard Shortcuts
Command + Shift + 3: Capture the Entire Screen
One of the simplest and quickest ways to take a screenshot on your MacBook is to use keyboard shortcuts. The most basic shortcut captures the entire screen:
- Press and hold the Command key (⌘) on your keyboard.
- While holding the Command key, press the Shift key (⇧).
- While holding both the Command and Shift keys, press the 3 key.
You should hear a camera shutter sound, indicating that the screenshot has been captured. By default, the screenshot will be saved as a .png file on your desktop.
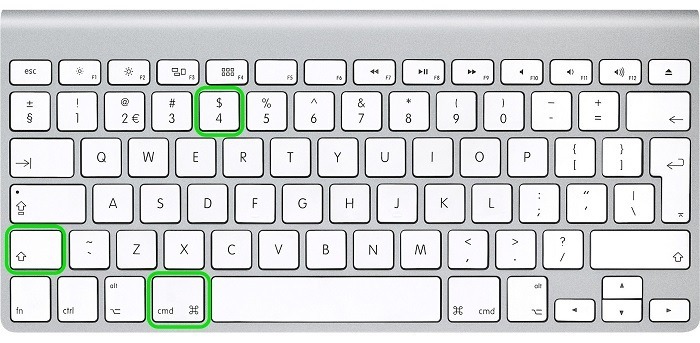
Command + Shift + 4: Capture a Selected Portion of the Screen
If you only want to capture a specific portion of your screen, you can use a slightly different keyboard shortcut:
- Press and hold the Command key (⌘) on your keyboard.
- While holding the Command key, press the Shift key (⇧).
- While holding both the Command and Shift keys, press the 4 key.
Your cursor will change to a crosshair. Click and drag to select the area of the screen you want to capture. When you release the mouse button, a screenshot of the selected area will be captured and saved to your desktop.
Using the Touch Bar (for MacBook Pro users)
If you have a MacBook Pro with a Touch Bar, you can take screenshots directly from the Touch Bar:
- Press and hold the Command key (⌘) on your keyboard.
- While holding the Command key, tap the Shift key (⇧) on the Touch Bar.
- Tap the 3 key on the Touch Bar to capture the entire screen, or tap the 4 key to capture a selected portion of the screen.
The process is similar to using keyboard shortcuts, but instead of pressing physical keys, you’ll tap virtual keys on the Touch Bar.
Using the Screenshot Utility
Accessing the Screenshot Utility
In addition to keyboard shortcuts and the Touch Bar, macOS also includes a built-in Screenshot utility that offers more options and flexibility:
- Press Command + Shift + 5 to open the Screenshot utility.
Capturing Screenshots with the Screenshot Utility
Once the Screenshot utility is open, you’ll see a toolbar at the bottom of the screen with various options for capturing screenshots:
- Capture Entire Screen: Click the first icon to capture the entire screen.
- Capture Selected Window: Click the second icon to capture a specific window. After clicking the icon, move your cursor over the window you want to capture, and then click to capture it.
- Capture Selected Portion: Click the third icon to capture a selected portion of the screen. After clicking the icon, click and drag to select the area you want to capture.
- Record Entire Screen: Click the fourth icon to start recording your screen.
- Record Selected Portion: Click the fifth icon to record a selected portion of the screen.
Advanced Screenshot Options
In addition to the basic capture options, the Screenshot utility offers several advanced features:
- Timer: Click the timer button to set a delay before capturing a screenshot or recording begins. This can be useful if you need to prepare the screen or open a menu before capturing.
- Options Menu: Click the options button to access additional settings, including where screenshots are saved, whether the mouse pointer is included in screenshots, and more.
Capturing screenshots on your MacBook is a simple yet powerful skill that can enhance your productivity, communication, and creativity. Whether you prefer keyboard shortcuts, the Touch Bar, or the Screenshot utility, knowing how to capture and share screenshots effectively can save you time and effort in countless situations. With the methods and tips outlined in this guide, you’ll be well-equipped to master the art of screenshotting on your MacBook.
Using Third-Party Apps
While macOS provides built-in methods for capturing screenshots, you may find that third-party apps offer additional features and flexibility. Here are a few popular options:
Snagit: Snagit is a powerful screenshot and screen recording tool that offers advanced editing capabilities, including annotations, shapes, and text. It also allows for easy sharing of screenshots to cloud services or other apps.
Skitch: Skitch is a simple yet effective screenshot tool developed by Evernote. It offers basic editing features such as annotations, arrows, and highlights, making it ideal for quick and easy markup of screenshots.
Lightshot: Lightshot is a lightweight screenshot tool that allows you to capture and annotate screenshots with ease. It also offers cloud storage integration, allowing you to easily share screenshots with others.
Jing: Jing is a free screenshot and screen recording tool developed by TechSmith, the same company behind Snagit. While Jing offers fewer features than Snagit, it’s still a useful tool for capturing and sharing screenshots.
Tips and Tricks for Effective Screenshotting
Now that you know how to capture screenshots on your MacBook, let’s explore some tips and tricks for making the most of this feature:
Organize Your Screenshots: To avoid cluttering your desktop with screenshots, create a dedicated folder for storing them. You can then organize your screenshots by date, project, or category for easy reference.
Use Keyboard Shortcuts: Memorizing keyboard shortcuts can save you time and effort when capturing screenshots. Practice using shortcuts like Command + Shift + 3 for capturing the entire screen or Command + Shift + 4 for capturing a selected portion.
Edit and Annotate: Take advantage of built-in editing tools or third-party apps to annotate your screenshots with text, arrows, highlights, and other elements. This can help you emphasize important information or provide context for the recipient.
Consider File Formats: By default, macOS saves screenshots as .png files, but you can change this behavior if you prefer a different file format. Open the Terminal app and enter the command “defaults write com.apple.screencapture type [file format]”, replacing [file format] with “jpg”, “pdf”, “tiff”, or another supported format.
Share with Ease: Once you’ve captured and edited your screenshot, share it with others using email, messaging apps, cloud storage services, or collaboration platforms. Most screenshot tools offer built-in sharing options for seamless communication.
Experiment with Settings: Explore the settings and preferences of your chosen screenshot tool to customize the capture behavior, file format, save location, and other options to suit your workflow.
Troubleshooting Common Issues
While capturing screenshots on your MacBook is generally straightforward, you may encounter occasional issues or errors. Here are some common troubleshooting tips:
Check Permissions: If you’re unable to capture screenshots or save them to a specific location, check the permissions settings for the destination folder. Ensure that you have the necessary write permissions to save files in that location.
Restart Your MacBook: Sometimes, a simple restart can resolve minor issues with the operating system or screenshot tools. Restart your MacBook and try capturing the screenshot again to see if the problem persists.
Update macOS: Make sure that your MacBook is running the latest version of macOS and that all software updates are installed. Updates often include bug fixes and performance improvements that can address issues with screenshot capture.
Reset Screenshot Preferences: If your screenshot tool is behaving unexpectedly, you can reset its preferences to default settings. This will revert any customizations you’ve made and may resolve the issue. Consult the documentation for your screenshot tool for instructions on how to reset preferences.
Check for Conflicting Software: Sometimes, third-party software or utilities can interfere with screenshot capture functionality. If you’ve recently installed or updated any software, try disabling it temporarily to see if it resolves the issue.
Related Post:
Mastering the Art of MacBook Reset: Your Ultimate Guide
Unveiling the Ultimate Powerhouse: MacBook Air 15 Inch – A Fusion of Elegance and Performance
MacBook Pro vs. MacBook Air: Unveiling the Ultimate Showdown
Mastering the art of capturing screenshots on your MacBook opens up a world of possibilities for communication, documentation, and creativity. Whether you’re a student, professional, or casual user, knowing how to take and share screenshots effectively can streamline your workflow and enhance your digital productivity. By utilizing the methods, tips, and tricks outlined in this guide, you’ll be well-equipped to capture, edit, and share screenshots with ease. So go ahead—capture the moment, save the memory, and share your screen with the world!