
Screenshots are an integral part of our digital communication toolkit, enabling us to capture and share moments, information, and inspiration with ease. Whether you’re a student, a professional, or a casual user, knowing how to take screenshots on your MacBook is a valuable skill that can enhance your productivity and communication capabilities. In this comprehensive guide, we’ll explore everything you need to know about taking screenshots on your MacBook, from the basics to advanced techniques and tips.
Understanding the Basics
Taking Your First Screenshot
Taking a screenshot on a MacBook is remarkably simple and can be accomplished in a few different ways. The most common method is by using keyboard shortcuts:
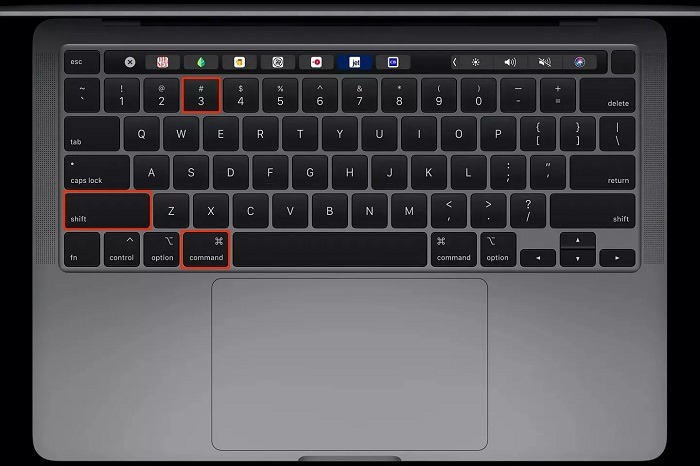
- Capturing the Entire Screen: Press Command (⌘) + Shift + 3 simultaneously. You’ll hear a camera shutter sound, indicating that the screenshot has been captured. The screenshot will be saved as a file on your desktop by default.
- Selecting a Specific Area: Press Command (⌘) + Shift + 4 simultaneously. Your cursor will turn into a crosshair. Click and drag to select the area of the screen you want to capture. Release the mouse button to take the screenshot.
- Capturing a Specific Window: Press Command (⌘) + Shift + 4 followed by the Spacebar. Your cursor will turn into a camera icon. Click on the window you want to capture. The screenshot will be saved as a file on your desktop.
Finding Your Screenshots
By default, screenshots taken on a MacBook are saved to the desktop. They are automatically named with a timestamp, making it easy to organize and locate them. However, you can also change the default save location if you prefer.
Exploring Advanced Techniques
Customizing Screenshot Settings
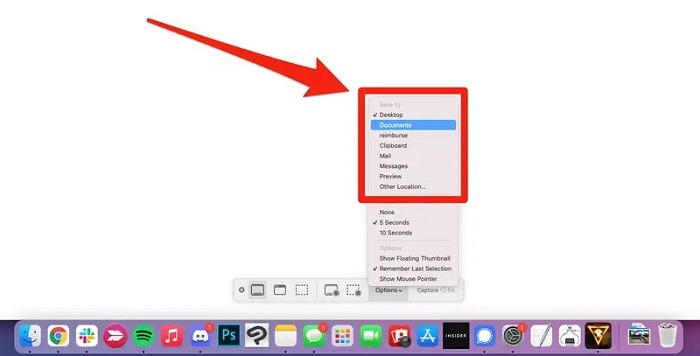
While the default screenshot settings on a MacBook are sufficient for most users, you can customize them to better suit your needs. To access screenshot settings, open the “Screenshot” preferences pane:
- Changing the Default Save Location: By default, screenshots are saved to the desktop. However, you can change this to a different location, such as the Documents folder or a specific folder of your choice.
- Adjusting the Screenshot Format: By default, screenshots are saved in the PNG format. However, you can change this to JPEG, TIFF, GIF, or PDF depending on your preferences.
- Enabling or Disabling the Floating Thumbnail: When you take a screenshot on macOS Mojave or later, a thumbnail preview of the screenshot appears in the corner of the screen. You can click on this thumbnail to edit the screenshot before saving it. If you find this feature distracting, you can disable it in the Screenshot preferences pane.
Taking Screenshots of Touch Bar
If you have a MacBook Pro with a Touch Bar, you can take screenshots of the Touch Bar display:
- Press Command (⌘) + Shift + 6: This captures the Touch Bar and saves it as a file on your desktop.
- Using Preview to Capture Specific Areas: If you want to capture a specific area of the Touch Bar, you can use the Preview app. Open Preview, go to “File” > “Take Screenshot” > “From Touch Bar.” You can then click and drag to select the area you want to capture.
Optimizing Your Workflow
Using Keyboard Shortcuts
Keyboard shortcuts are a quick and efficient way to take screenshots on your MacBook. By memorizing a few key combinations, you can streamline your workflow and capture screenshots with ease.
- Learn the Basics: Start by mastering the basic keyboard shortcuts for capturing the entire screen, selecting a specific area, and capturing a specific window.
- Practice Regularly: Like any skill, taking screenshots on your MacBook becomes easier with practice. Spend some time familiarizing yourself with the keyboard shortcuts until they become second nature.
- Explore Advanced Shortcuts: In addition to the standard shortcuts, macOS offers several advanced keyboard shortcuts for taking screenshots. For example, you can add Control to any of the standard shortcuts to copy the screenshot to the clipboard instead of saving it as a file.
Using Third-Party Apps
While macOS comes with built-in screenshot tools that meet the needs of most users, there are also several third-party apps available that offer additional features and functionality:
- Snagit: Snagit is a popular screenshot app that offers a wide range of editing tools, including annotations, text overlays, and resizing options. It’s perfect for users who need more advanced editing capabilities than what is offered by macOS’s built-in tools.
- Skitch: Skitch is a simple yet powerful screenshot app developed by Evernote. It allows you to capture screenshots, annotate them with arrows, shapes, and text, and share them with others. It’s great for collaborating on projects or giving feedback on designs.
- Lightshot: Lightshot is a lightweight screenshot tool that offers fast and easy screenshot capture. It allows you to select a specific area of the screen, annotate it with text and shapes, and share it with others. It’s perfect for users who need a simple and intuitive screenshot solution.
Mastering the art of taking screenshots on your MacBook is a valuable skill that can enhance your productivity and communication capabilities. Whether you’re capturing important information for work, creating tutorials for others, or simply sharing moments with friends and family, knowing how to take screenshots effectively is essential. By understanding the basics, exploring advanced techniques, and optimizing your workflow, you can become a screenshot pro in no time. So go ahead, capture brilliance on your MacBook and share it with the world!
Exploring Additional Tips and Tricks
Taking Timed Screenshots
In addition to capturing static screenshots, macOS also allows you to take timed screenshots, which can be useful in various situations:
- Using the Grab App: The Grab app, found in the Utilities folder of your Applications folder, offers the option to take timed screenshots. Simply open Grab, go to “Capture” in the menu bar, and select “Timed Screen.” You can then set a timer for 10 seconds, giving you time to set up the screen before the screenshot is taken.
- Using Terminal Commands: For more advanced users, macOS also offers the option to take timed screenshots using Terminal commands. By entering the appropriate command in Terminal, you can specify the delay before the screenshot is captured, allowing you to capture dynamic content such as menus or tooltips.
Organizing and Managing Screenshots
As you capture more and more screenshots on your MacBook, it’s essential to have a system in place for organizing and managing them effectively:
- Creating Folders: Consider creating dedicated folders on your desktop or in your Documents folder to organize your screenshots by category or project. This can help you stay organized and quickly locate specific screenshots when you need them.
- Renaming Screenshots: By default, screenshots taken on a MacBook are named with a timestamp, which can be difficult to decipher. Take the time to rename your screenshots with descriptive filenames that reflect their contents. This will make it easier to search for and identify specific screenshots in the future.
- Using Tags: macOS offers the option to tag files and folders with descriptive keywords, making it easier to categorize and search for them. Consider adding tags to your screenshots based on their contents or relevance, allowing you to quickly filter and locate them using Spotlight or the Finder.
Editing and Annotating Screenshots
While macOS’s built-in screenshot tools offer basic editing capabilities, you may occasionally need to make more advanced edits or annotations to your screenshots:
- Using Preview: Preview, the default image viewer on macOS, offers a range of editing tools that allow you to crop, resize, annotate, and add text to your screenshots. Simply open the screenshot in Preview, select the “Tools” menu, and choose the desired editing option.
- Using Third-Party Apps: If you require more advanced editing capabilities, consider using third-party image editing apps such as Adobe Photoshop or Pixelmator. These apps offer a wide range of tools and features for editing and enhancing screenshots, including layers, filters, and effects.
Sharing Screenshots
Once you’ve captured and edited your screenshots, it’s time to share them with others. macOS offers several options for sharing screenshots, depending on your preferences and the intended recipient:
- Using Email: If you need to share a screenshot via email, simply attach the screenshot file to your email message. Most email clients, including Apple Mail and Gmail, support attaching image files directly to messages.
- Using Messaging Apps: If you prefer to share screenshots via messaging apps such as iMessage or WhatsApp, you can do so by attaching the screenshot file to a chat conversation. Most messaging apps support sharing image files, making it easy to send screenshots to friends and colleagues.
- Using Cloud Storage: If you need to share a large number of screenshots or collaborate on them with others, consider using cloud storage services such as iCloud Drive, Dropbox, or Google Drive. Simply upload the screenshot files to your cloud storage account and share the link with the intended recipients.
Troubleshooting Common Issues
While taking screenshots on a MacBook is generally straightforward, you may encounter occasional issues or challenges:
- Screenshots Not Saving: If you’re having trouble saving screenshots on your MacBook, first check that you have sufficient disk space available. If your disk is full, macOS may be unable to save new files, including screenshots. Try freeing up disk space by deleting unnecessary files or transferring them to an external drive.
- Incorrect Keyboard Shortcuts: If the default keyboard shortcuts for taking screenshots on your MacBook aren’t working, check that the keyboard settings are configured correctly in System Preferences. You can also try resetting the keyboard shortcuts to their default settings by going to “Keyboard” > “Shortcuts” > “Reset All.”
Related Post:
Mastering MacBook Updates: Your Ultimate Guide to Keeping Your Apple Device Fresh and Efficient
Unlocking Possibilities: Mastering the MacBook Password Reset
Unleashing the Powerhouse: Exploring the Marvels of the MacBook Pro M1 Max
Screenshots appear blurry or pixelated, it may be due to the image format or compression settings. Try changing the screenshot format to PNG or increasing the image quality in the Screenshot preferences pane to improve the quality of your screenshots.