
Navigating through your MacBook efficiently is crucial for maximizing productivity and ease of use. While MacBooks are renowned for their sleek design and intuitive interface, some users may find themselves puzzled when it comes to performing certain actions, such as right-clicking.
In this guide, we’ll delve into the various methods of right-clicking on a MacBook, exploring both built-in features and third-party options. Whether you’re a seasoned MacBook user or a newcomer to the platform, this comprehensive guide will equip you with the knowledge needed to effortlessly right-click like a pro.
Understanding Right-Clicking on a MacBook
Before diving into the methods of right-clicking on a MacBook, let’s first understand what right-clicking entails. Traditionally, right-clicking refers to pressing the right button on a mouse or trackpad to access context menus and additional options. However, MacBooks are known for their minimalist design, often featuring trackpads with no distinct right-click button.
Built-in Methods for Right-Clicking
Despite the absence of a dedicated right-click button, MacBook trackpads offer several built-in methods for right-clicking:
Method 1: Two-Finger Click
One of the most common ways to right-click on a MacBook is by using a two-finger click gesture. Follow these steps to perform a two-finger click:
- Place two fingers on the trackpad.
- Click by pressing down with both fingers simultaneously.
This action should trigger a right-click, displaying the context menu associated with the selected item.
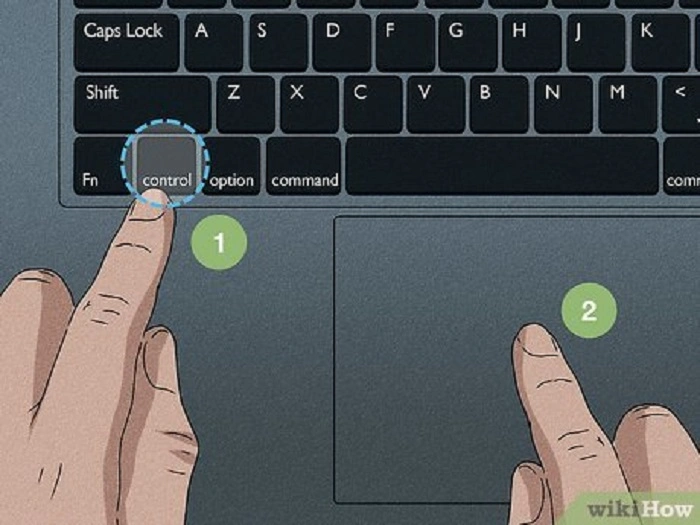
Method 2: Control + Click
Another built-in method for right-clicking on a MacBook involves using the Control key in conjunction with a standard click. Here’s how to do it:
- Position the cursor over the item you want to right-click.
- Hold down the Control key on the keyboard.
- While holding the Control key, click the trackpad or mouse button.
This action emulates a right-click, allowing you to access context menus and additional options.
Method 3: Enable Secondary Click
MacBooks offer the option to enable a secondary click, which allows users to right-click by clicking the bottom-right corner of the trackpad. To enable secondary click:
- Go to the Apple menu and select “System Preferences.”
- Click on “Trackpad” or “Mouse,” depending on your device.
- In the Trackpad or Mouse settings, locate the “Secondary Click” option.
- Check the box next to “Secondary Click” to enable it.
Once enabled, you can right-click by clicking the bottom-right corner of the trackpad.
Third-Party Solutions for Right-Clicking

While the built-in methods for right-clicking on a MacBook are sufficient for most users, some may prefer alternative solutions for enhanced functionality. Several third-party applications offer customizable options for right-clicking on a MacBook:
Option 1: BetterTouchTool
BetterTouchTool is a versatile application that allows users to customize various gestures and shortcuts on their MacBooks. In addition to enhancing trackpad gestures, BetterTouchTool offers advanced options for right-clicking, including the ability to assign custom actions to specific gestures.
To use BetterTouchTool for right-clicking:
- Download and install BetterTouchTool from the developer’s website.
- Launch BetterTouchTool and navigate to the “Trackpad” tab.
- Click on “Add New Gesture” and select the gesture you want to assign to right-clicking.
- Choose “Secondary Click” as the predefined action for the gesture.
With BetterTouchTool, you can tailor right-clicking to suit your preferences, making it an excellent choice for power users seeking greater control over their MacBook’s functionality.
Option 2: MagicPrefs
MagicPrefs is another third-party application that provides advanced customization options for MacBook trackpads. In addition to gesture customization, MagicPrefs offers precise control over right-clicking behavior, allowing users to fine-tune sensitivity and other parameters.
To use MagicPrefs for right-clicking:
- Download and install MagicPrefs from the developer’s website.
- Launch MagicPrefs and navigate to the “Trackpad” section.
- Adjust the settings for right-clicking, such as sensitivity and activation method.
- Save your changes and enjoy enhanced control over right-clicking on your MacBook.
Mastering the art of right-clicking on a MacBook is essential for efficient navigation and productivity. Whether you prefer built-in methods or third-party solutions, there are plenty of options available to suit your needs. By familiarizing yourself with the techniques outlined in this guide, you’ll be able to unleash the full potential of your MacBook’s trackpad and streamline your workflow like never before. Happy clicking!
Exploring Advanced Right-Clicking Techniques
While the basic methods covered thus far provide effective ways to right-click on a MacBook, there are additional advanced techniques and tips that can further enhance your experience.
Customizing Trackpad Gestures
MacBooks offer a range of built-in trackpad gestures that can be customized to suit your preferences. By leveraging these gestures, you can streamline your workflow and perform actions with ease. Here are a few examples:
- Three-Finger Tap: Configure your MacBook to perform a right-click when you tap with three fingers on the trackpad. This gesture can be enabled in the Trackpad settings under “Point & Click.”
- Custom Gestures with BetterTouchTool: As mentioned earlier, BetterTouchTool allows for extensive customization of trackpad gestures. Consider creating custom gestures tailored to your specific workflow, including advanced right-click actions.
- Accessibility Options: Explore the accessibility settings on your MacBook, as they may offer alternative methods for performing right-clicks. For example, enabling “Tap to Click” allows you to perform a right-click by tapping the trackpad with one finger while simultaneously pressing the Control key.
By experimenting with these advanced techniques, you can discover new ways to right-click and navigate your MacBook more efficiently.
Integrating Keyboard Shortcuts
In addition to trackpad gestures, keyboard shortcuts can also be used to perform right-click actions on a MacBook. While the Control + Click method is commonly known, there are other keyboard shortcuts that can provide similar functionality:
- Function (Fn) Key + Control + Click: Some MacBook models feature a Function (Fn) key that, when combined with Control + Click, emulates a right-click. This shortcut is particularly useful for users who prefer using keyboard combinations over trackpad gestures.
- Custom Keyboard Shortcuts: Take advantage of macOS’s built-in keyboard shortcut customization feature to create your own shortcuts for right-clicking. Navigate to “System Preferences > Keyboard > Shortcuts” to define custom key combinations for various actions, including right-clicking.
By incorporating keyboard shortcuts into your workflow, you can perform right-click actions more efficiently and minimize reliance on trackpad gestures.
Exploring Third-Party Alternatives
While macOS offers robust built-in features for right-clicking, there are several third-party applications and utilities that can further augment your experience:
- Contexts: Contexts is a powerful application switcher for macOS that enhances multitasking and window management. In addition to its primary features, Contexts offers customizable right-click actions, allowing you to perform advanced actions on selected items.
- PopClip: PopClip is a versatile utility that provides instant access to context menus when you select text or images. With PopClip, you can perform right-click actions with a single click, eliminating the need to navigate through menus manually.
- Alfred: Alfred is a productivity application that offers a range of features, including customizable hotkeys and workflows. With Alfred’s Powerpack, you can create custom workflows to perform right-click actions and automate repetitive tasks.
By exploring third-party alternatives, you can tailor your right-clicking experience to suit your specific needs and preferences.
Mastering the art of right-clicking on a MacBook is a fundamental skill that can significantly enhance your productivity and workflow efficiency. Whether you prefer built-in methods, advanced techniques, or third-party solutions, there are plenty of options available to suit your needs.
By familiarizing yourself with the techniques and tips outlined in this guide, you’ll be well-equipped to navigate your MacBook with confidence and precision. Whether you’re a casual user or a seasoned pro, incorporating these strategies into your workflow will empower you to make the most of your MacBook’s capabilities. Happy clicking!