
The MacBook has various notification sounds, including a ringer that alerts you to incoming FaceTime calls, messages, and other notifications. While this is a useful feature, there are times when you might want to silence it, especially in meetings, during work, or when you just need some quiet. Fortunately, turning off the ringer on your MacBook is straightforward. In this guide, we’ll walk you through several methods to turn off or mute the ringer on your MacBook, depending on the situation.
Turn Off the Ringer via System Preferences
One of the easiest ways to disable the ringer on your MacBook is through System Preferences. Here’s how you can do it:
Step-by-Step Instructions:
Open System Preferences: Click on the Apple logo in the top-left corner of your screen and select System Preferences.
Go to Sound: In the System Preferences window, click on Sound.
Adjust Alert Volume: In the Sound menu, you’ll see a section for Alert volume. You can either slide the volume bar to the left to mute the alerts or completely disable the “Play sound effects through” option.
Mute Alerts: If you want to turn off all notification sounds, simply drag the slider for Alert volume to zero. This will mute any ringer or notification sound alerts.
Additional Option:
- In the Sound menu, you can also disable the option that plays sound effects through the built-in speakers. This will prevent any audio alerts from playing through your MacBook’s speakers.
Mute Incoming Calls (FaceTime & Phone Calls)
If you’re receiving calls through FaceTime or Phone (via Continuity from an iPhone), you may want to turn off the ringer just for calls. Here’s how you can adjust those settings:
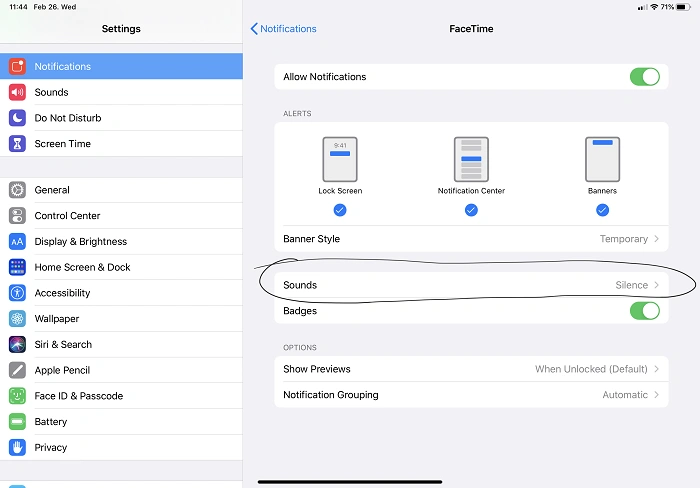
For FaceTime:
Open FaceTime: Launch the FaceTime app from your Applications folder.
Turn Off Notifications: Click on FaceTime in the top menu bar and select Preferences.
Disable Call Alerts: Uncheck the box next to “Ringtone” in the preferences section to stop the ringer from sounding for FaceTime calls.
For iPhone Calls on Mac:
If you have an iPhone, you may be receiving calls through Continuity. To mute this feature:
Open the iPhone Settings: Go to your iPhone settings.
Disable Calls on Mac: Scroll down to Phone and select Calls on Other Devices. Toggle off the option for your MacBook.
This will stop incoming iPhone calls from triggering a ringer on your MacBook.
Using Do Not Disturb (DND) Mode
When you don’t want to hear any notifications at all, Do Not Disturb (DND) is your best friend. Enabling DND will silence all incoming notifications, including FaceTime calls, messages, and app alerts.
How to Turn On Do Not Disturb:
Click on the Notification Center: On the top-right corner of your MacBook screen, click the notification icon (it looks like three stacked lines).
Activate Do Not Disturb: At the top of the Notification Center, you’ll see a button labeled Do Not Disturb. Simply click it to turn on DND. You can also schedule Do Not Disturb by going into System Preferences > Notifications and setting specific hours for it to be automatically activated.
When DND is enabled, your MacBook will no longer make sounds or show pop-up notifications for incoming alerts, including the ringer.
Mute the MacBook’s System Volume
If you’re trying to turn off the ringer for specific applications, or just want to silence all sounds on your MacBook, you can mute the system volume entirely.
How to Mute the Volume:
Click on the Sound Icon: In the top-right corner of your MacBook, click the sound icon in the menu bar.
Mute the Volume: Simply drag the volume slider all the way to the left or click on the speaker icon to mute the sound.
This method will mute all system sounds, including the ringer and alert tones, but still allow you to use other sound-related features, such as media playback, if needed.
Mute the Ringer for Specific Apps
If you don’t want to mute the entire system but want to turn off the ringer for specific apps (such as notifications from iMessage or email), you can adjust the app-specific notification settings.
For iMessage:
Open Messages: Launch the Messages app on your MacBook.
Go to Preferences: In the top menu, click Messages and then select Preferences.
Disable Sound: In the Notifications tab, uncheck the Play sound for new messages option.
For Email Apps:
Open Mail: Launch the Mail app.
Go to Preferences: In the top menu, select Mail and then choose Preferences.
Adjust Notifications: Under the General tab, you can change the sound alert settings for new emails. Set it to None if you want to silence the ringer for email notifications.
For Other Apps:
Many third-party apps like Slack, Zoom, or Skype allow you to turn off their specific notification sounds from within the app settings. Look for Notification or Sound settings in the preferences of the app you wish to modify.
Disable Notification Sounds for Other Services (e.g., Calendar, Reminders)
You may also want to disable notification sounds for services like Calendar and Reminders that can cause the ringer to sound at inconvenient times.
How to Turn Off Notification Sounds:
- Go to System Preferences: Open System Preferences from the Apple menu.
- Select Notifications: Click on Notifications.
- Adjust App-Specific Settings: Find the app (e.g., Calendar, Reminders) in the list on the left, then uncheck the box for Play sound for notifications to turn off sound alerts.
FAQs About Turning Off the Ringer on MacBook
How do I stop FaceTime calls from ringing on my MacBook?
You can disable the ringer for FaceTime calls in FaceTime Preferences by unchecking the Ringtone option or disabling the “Calls from iPhone” feature in the iPhone settings.
Can I mute all notifications on my MacBook at once?
Yes, you can use Do Not Disturb mode to mute all notifications on your MacBook. You can activate this from the Notification Center or schedule it in System Preferences > Notifications.
How do I turn off the ringer on iMessages?
To stop the ringer on iMessages, go to Messages > Preferences, then uncheck the Play sound for new messages option in the Notifications tab.
Can I mute just the ringer without muting other sounds?
Yes, by adjusting app-specific notification settings (like for Messages or FaceTime) or using Do Not Disturb, you can mute just the ringer without affecting other sounds.
How do I turn off system notification sounds on my MacBook?
You can disable system notification sounds in System Preferences > Sound, where you can adjust or mute Alert volume.