
In the ever-evolving digital landscape, the need to erase or reset devices like MacBook Pro is becoming increasingly common. Whether you’re preparing to sell your MacBook Pro, troubleshooting persistent issues, or simply seeking a fresh start, knowing how to effectively erase your device is crucial. In this comprehensive guide, we’ll explore various methods to erase your MacBook Pro securely and efficiently, ensuring your data remains protected while restoring your device to its factory settings.
Understanding the Importance of Secure Data Erasure
Before diving into the methods of erasing your MacBook Pro, it’s essential to understand the importance of secure data erasure. When you delete files or format your device conventionally, traces of data often remain intact, leaving them vulnerable to unauthorized access. Secure data erasure methods ensure that sensitive information is permanently removed, reducing the risk of data breaches and identity theft.
Backup Your Data Before Erasing
Before initiating the erasure process, it’s critical to back up your data to prevent accidental loss. You can use Time Machine, Apple’s built-in backup feature, or third-party backup solutions like Carbon Copy Cloner or SuperDuper. Ensure that your backup is up to date and stored securely before proceeding with the erasure process.
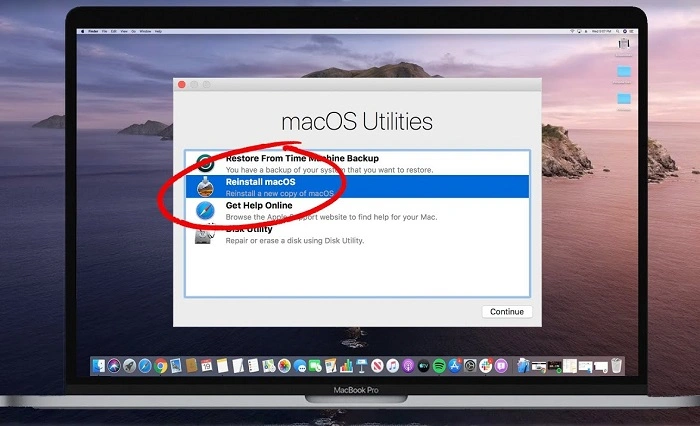
Using macOS Recovery
macOS Recovery is a built-in feature that allows you to troubleshoot and reinstall macOS on your MacBook Pro. Follow these steps to erase your device using macOS Recovery:
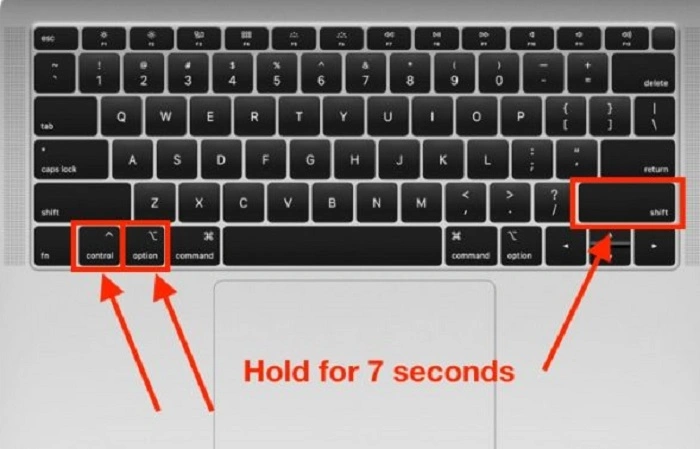
Restart Your MacBook Pro
Restart your MacBook Pro and hold down the Command (⌘) and R keys simultaneously until the Apple logo appears, indicating that your device is booting into macOS Recovery.
Access Disk Utility
Once in macOS Recovery, select “Disk Utility” from the Utilities menu and click “Continue.” Disk Utility allows you to manage and erase disk partitions on your MacBook Pro.
Erase Your Disk
In Disk Utility, select your MacBook Pro’s internal disk (usually named “Macintosh HD” or similar) from the list of available drives. Click on the “Erase” button and follow the on-screen prompts to confirm the erasure process. You’ll be prompted to choose a file system format – select “APFS” for macOS Catalina and later, or “Mac OS Extended (Journaled)” for earlier versions.
Reinstall macOS
Once the disk erasure is complete, exit Disk Utility and select “Reinstall macOS” from the macOS Utilities window. Follow the on-screen instructions to reinstall macOS on your freshly erased MacBook Pro.
Securely Erasing Your MacBook Pro
If you’re concerned about data security and want to ensure that your personal information is irrecoverable, you can use secure erasure methods. One such method is using the built-in Disk Utility feature with the option to securely erase data. Here’s how:
Access Disk Utility
Follow the same steps outlined in Method 1 to access Disk Utility from macOS Recovery.
Select Securely Erase Option
In Disk Utility, select your MacBook Pro’s internal disk and click on the “Erase” button. This time, instead of a regular erase, choose the option for “Security Options” or “Erase Free Space.” Here, you’ll have the opportunity to select different levels of secure erasure, ranging from single-pass to multiple-pass options.
Confirm Erasure Process
Choose the desired security level and click “OK” to confirm the erasure process. Be aware that higher security levels may take significantly longer to complete but offer greater assurance that your data is securely erased.
Reinstall macOS
Once the secure erasure process is complete, proceed to reinstall macOS using the steps outlined in Method 1.
Erasing your MacBook Pro doesn’t have to be a daunting task. By following the methods outlined in this guide, you can securely and efficiently erase your device, ensuring that your data remains protected and your device restored to its factory settings. Remember to back up your data before initiating the erasure process and consider using secure erasure methods for enhanced data security. With these steps, you’ll be able to master the art of erasing your MacBook Pro with confidence.
Using Find My
If your MacBook Pro is running macOS Catalina or later, you can utilize the Find My feature to remotely erase your device. This method is particularly useful if your MacBook Pro is lost or stolen and you want to ensure that your data remains secure. Here’s how to use Find My to erase your MacBook Pro:
Access Find My
Open the Find My app on another Apple device or visit the iCloud website on a web browser. Sign in with your Apple ID and password.
Locate Your MacBook Pro
In the Find My app or iCloud website, select your MacBook Pro from the list of devices associated with your Apple ID. If your MacBook Pro is online and connected to the internet, its location will be displayed on the map.
Erase Your MacBook Pro
Once you’ve located your MacBook Pro, select the “Erase Mac” option. Follow the on-screen prompts to confirm the erasure process. Keep in mind that erasing your MacBook Pro using Find My will permanently delete all data on the device, so ensure that you’ve backed up any important information beforehand.
Activation Lock
After erasing your MacBook Pro using Find My, Activation Lock will be enabled, preventing anyone else from activating or using your device without your Apple ID and password. This adds an additional layer of security to protect your data and deter theft.
Using Third-Party Software
In addition to the built-in methods provided by macOS, there are third-party software solutions available that offer advanced features for securely erasing your MacBook Pro. These software tools often provide more customization options and can securely erase data beyond recovery. Here are some popular third-party software options:
- Blancco Drive Eraser: Blancco Drive Eraser is a professional-grade data erasure tool trusted by organizations worldwide. It offers certified data erasure methods and comprehensive reporting features to ensure compliance with data privacy regulations.
- Disk Drill: Disk Drill is a versatile data recovery and disk management tool that also includes data erasure capabilities. It allows you to securely erase entire drives or individual files using advanced algorithms to prevent data recovery.
- Secure Eraser: Secure Eraser is a user-friendly data erasure tool that offers multiple erasure methods, including DoD 5220.22-M and Gutmann, to securely wipe data from your MacBook Pro. It also includes a disk cleanup feature to free up disk space and optimize performance.
Before using third-party software to erase your MacBook Pro, be sure to research and choose a reputable solution from a trusted developer. Additionally, always back up your data before initiating the erasure process to prevent accidental loss.
Erasing your MacBook Pro is a necessary step for various reasons, whether you’re preparing to sell or recycle your device, troubleshooting issues, or enhancing security measures. By following the methods outlined in this guide, you can confidently erase your MacBook Pro while ensuring that your data remains protected and your device restored to its factory settings.
From utilizing built-in features like macOS Recovery and Find My to exploring third-party software solutions, there are multiple options available to suit your specific needs and preferences. Remember to back up your data before initiating the erasure process and consider using secure erasure methods for enhanced data security.
With the knowledge gained from this guide, you’ll be well-equipped to master the art of erasing your MacBook Pro efficiently and securely, giving you peace of mind and a fresh start with your device.