
In the fast-paced world of technology, it’s not uncommon to encounter issues with our devices that require a fresh start. Whether your MacBook Air 2017 is sluggish, experiencing software glitches, or you simply want to wipe it clean for a fresh beginning, performing a factory reset can be the solution. However, this process can seem daunting if you’re not familiar with it. Fear not! In this comprehensive guide, we’ll walk you through the step-by-step process of factory resetting your MacBook Air 2017.
Understanding Factory Reset: What It Means
Before diving into the process, it’s essential to understand what a factory reset entails. Essentially, a factory reset restores your MacBook Air to its original state when it was first purchased from the factory. This means all your data, settings, and applications will be erased, returning the device to its default settings.
Backup Your Data
The first and most crucial step before initiating a factory reset is to backup all your important data. This includes documents, photos, videos, and any other files you want to keep. You can use Time Machine, Apple’s built-in backup feature, or any other preferred backup method to ensure you don’t lose any valuable information.
Deauthorize Your MacBook Air
If you have any applications or services tied to your MacBook Air, such as iTunes or Adobe Creative Cloud, it’s essential to deauthorize the device beforehand. Failure to do so could result in complications when reinstalling these applications after the reset. To deauthorize your MacBook Air, simply open the respective applications and follow the instructions to deauthorize the device.
Disconnect External Devices
Before proceeding with the factory reset, disconnect any external devices, such as USB drives, external hard drives, or printers, from your MacBook Air. This ensures that only the internal storage of the device is affected during the reset process.
Restart Your MacBook Air in Recovery Mode
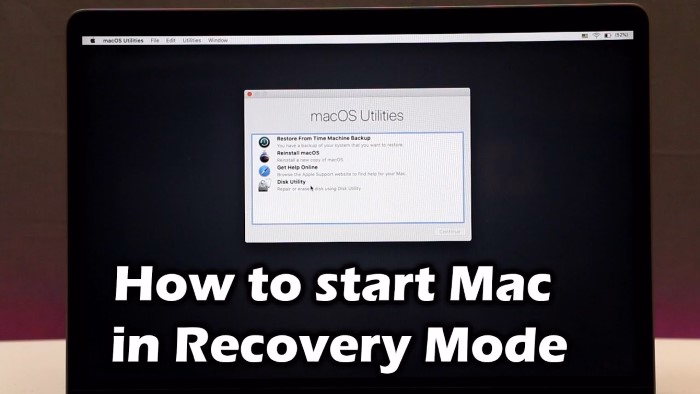
To begin the factory reset process, restart your MacBook Air and hold down the Command (⌘) and R keys simultaneously until the Apple logo appears on the screen. This will boot your MacBook Air into Recovery Mode, a built-in macOS utility that allows you to perform various tasks, including reinstalling macOS and erasing the disk.
Access Disk Utility
Once in Recovery Mode, you’ll be presented with several options. Select “Disk Utility” from the list and click “Continue.” Disk Utility is a tool that allows you to manage and format the internal storage of your MacBook Air.
Erase the Disk
In Disk Utility, you’ll see a list of all the disks connected to your MacBook Air. Select the main internal disk (usually named “Macintosh HD” or something similar) and click on the “Erase” button. This will prompt you to choose a format for the disk. Select “Mac OS Extended (Journaled)” or “APFS” as the format type, depending on your preference and the version of macOS you’re using.
Perform the Factory Reset
Once the disk has been erased, close Disk Utility and return to the main menu in Recovery Mode. Select “Reinstall macOS” and follow the on-screen instructions to reinstall the operating system on your MacBook Air. This process may take some time, so be patient and ensure your MacBook Air is connected to a power source.
Set Up Your MacBook Air
Once the operating system has been reinstalled, your MacBook Air will restart and prompt you to set it up as a new device. Follow the on-screen instructions to configure your language, region, Wi-Fi network, and user account settings. You’ll also have the option to restore your data from a Time Machine backup or transfer files from another Mac or PC.
Congratulations! You’ve successfully factory reset your MacBook Air 2017 and are ready to start fresh. Whether you’re troubleshooting issues or preparing to pass on your device to a new owner, performing a factory reset is a valuable skill every Mac user should know. Remember to regularly backup your data and take caution when performing system-level operations to ensure a smooth experience with your MacBook Air.
Advanced Tips for Maximizing the Efficiency of Your MacBook Air 2017

Now that you’ve mastered the art of factory resetting your MacBook Air 2017, let’s delve deeper into some advanced tips and tricks to optimize its performance and enhance your overall user experience.
Utilize macOS Recovery Tools
In addition to factory resetting, macOS Recovery offers a range of other useful tools that can help troubleshoot and maintain your MacBook Air. For example, Disk Utility can be used not only for erasing disks but also for repairing disk errors and managing partitions. Additionally, you can use Terminal within Recovery Mode to perform advanced tasks, such as resetting forgotten passwords or repairing file permissions.
Enable FileVault for Enhanced Security
FileVault is a built-in encryption feature in macOS that encrypts the contents of your disk, providing an extra layer of security for your data. By enabling FileVault, you can ensure that even if your MacBook Air falls into the wrong hands, your personal information remains inaccessible. To enable FileVault, go to System Preferences > Security & Privacy > FileVault, and follow the on-screen instructions to set it up.
Manage Startup Items
Over time, your MacBook Air may accumulate unnecessary startup items that can slow down the boot process and consume system resources. To manage startup items, go to System Preferences > Users & Groups > Login Items, and remove any unnecessary applications from the list. This can help streamline the startup process and improve overall system performance.
Clean Up Your Disk
Regularly cleaning up your disk can help free up valuable storage space and improve the performance of your MacBook Air. macOS offers built-in tools like Disk Utility and Storage Management to help you identify and remove unnecessary files and applications. Additionally, third-party utilities like CleanMyMac or DaisyDisk can provide more advanced disk cleaning and optimization features.
Monitor System Activity
Understanding how your MacBook Air is utilizing its resources can help identify potential issues and optimize performance. macOS includes built-in utilities like Activity Monitor, which provides detailed information about CPU, memory, disk, and network usage. By monitoring system activity, you can identify resource-intensive processes or applications and take action to address them.
Keep Your Software Up to Date
Regularly updating macOS and your installed applications is essential for maintaining the security and performance of your MacBook Air. macOS updates often include bug fixes, performance improvements, and security patches that can help keep your system running smoothly. Additionally, updating third-party applications ensures you have access to the latest features and compatibility updates.
Optimize Energy Settings
Adjusting your MacBook Air’s energy settings can help extend battery life and improve overall efficiency. macOS includes a range of energy-saving features, such as Power Nap and App Nap, which help reduce power consumption when your MacBook Air is idle or running on battery power. Additionally, you can manually adjust energy-saving settings in System Preferences > Energy Saver to customize power management according to your preferences.
Utilize iCloud for Seamless Integration
iCloud integration allows you to seamlessly sync your data across all your Apple devices, including your MacBook Air. By enabling iCloud Drive, iCloud Photos, and other iCloud services, you can access your files, photos, and documents from anywhere and ensure they’re always up to date. Additionally, iCloud offers features like Find My Mac, which can help locate and secure your MacBook Air in case it’s lost or stolen.
By implementing these advanced tips and tricks, you can take your MacBook Air 2017 to the next level and unlock its full potential. From optimizing performance and enhancing security to streamlining workflows and maximizing efficiency, these techniques will help you get the most out of your MacBook Air and ensure a smooth and seamless user experience for years to come.