
In the digital age, screenshots have become an indispensable tool for communication, troubleshooting, and creativity. Whether you’re capturing a memorable moment, sharing information with colleagues, or documenting an issue for technical support, knowing how to take a screenshot on your MacBook Pro is essential. In this comprehensive guide, we’ll explore various methods and tips to help you become a screenshot pro on your MacBook Pro.
Understanding Different Types of Screenshots
Before diving into the nitty-gritty of taking screenshots on your MacBook Pro, it’s essential to understand the different types of screenshots you can capture:
- Full-Screen Screenshot: Captures the entire contents of your screen, including menus, windows, and desktop icons.
- Window Screenshot: Selectively captures a specific window or application on your screen.
- Selection Screenshot: Allows you to draw a custom rectangle to capture a portion of your screen.
- Touch Bar Screenshot: Specifically captures the content displayed on your MacBook Pro’s Touch Bar.
Methods for Taking Screenshots
Now, let’s explore the various methods available for taking screenshots on your MacBook Pro:
Using Keyboard Shortcuts:
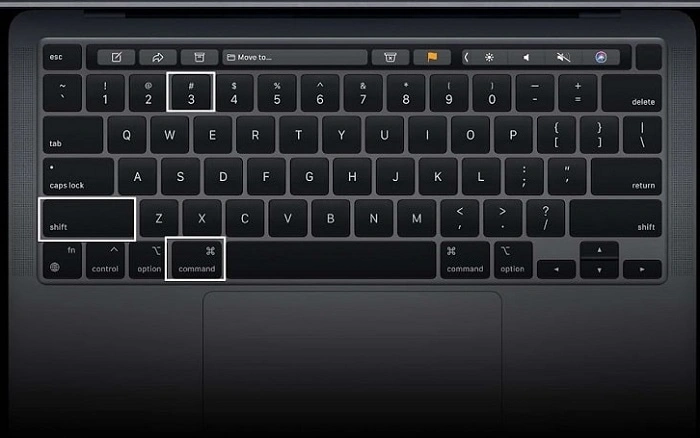
- Full-Screen Screenshot: Press Command (⌘) + Shift + 3 simultaneously.
- Window Screenshot: Press Command (⌘) + Shift + 4, then press the Spacebar. Click on the window you want to capture.
- Selection Screenshot: Press Command (⌘) + Shift + 4. Use your cursor to draw a rectangle around the area you want to capture.
- Touch Bar Screenshot: Press Command (⌘) + Shift + 6.
Using the Screenshot App:
- Launch the Screenshot app by pressing Command (⌘) + Shift + 5.
- Choose the desired screenshot type (Full Screen, Selected Window, or Selected Portion) from the toolbar.
- Customize additional options such as timer delay, saving location, and including the mouse pointer if needed.
- Click “Capture” to take the screenshot.
Using Preview:
- Open Preview from the Applications folder or using Spotlight search.
- Go to “File” > “Take Screenshot” and select the desired option (From Selection, From Window, or From Entire Screen).
- Preview will capture the screenshot according to your selection.
Tips for Enhancing Your Screenshots
Taking a screenshot is just the beginning. Here are some tips for enhancing your screenshots and making them more effective:
- Use Annotations: After capturing a screenshot, use the Markup tools available in Preview or the Screenshot app to add annotations, text, arrows, shapes, and highlights to emphasize specific areas.
- Organize Your Screenshots: Develop a systematic approach to organizing your screenshots. Create folders and subfolders based on categories or projects to keep your screenshots neatly organized.
- Utilize Keyboard Shortcuts: Familiarize yourself with keyboard shortcuts for accessing screenshot features quickly. This will save you time and streamline your workflow.
- Experiment with Different Formats: macOS allows you to save screenshots in various formats such as PNG, JPEG, TIFF, and PDF. Experiment with different formats to find the one that best suits your needs in terms of quality and file size.
- Explore Third-Party Apps: While macOS offers robust built-in screenshot tools, consider exploring third-party screenshot apps for additional features and customization options.
Common Troubleshooting Tips
Encountering issues while taking screenshots on your MacBook Pro? Here are some common troubleshooting tips to help you resolve them:
- Check Keyboard Settings: Ensure that your keyboard settings are configured correctly. If certain keyboard shortcuts aren’t working, go to System Preferences > Keyboard > Shortcuts to verify or customize keyboard shortcuts.
- Restart Your MacBook Pro: Sometimes, a simple restart can resolve software glitches or temporary issues affecting screenshot functionality.
- Free Up Storage Space: Insufficient storage space on your MacBook Pro can sometimes prevent screenshots from being saved. Delete unnecessary files or move them to an external drive to free up space.
- Update macOS: Make sure your MacBook Pro is running the latest version of macOS. Software updates often include bug fixes and improvements that can address screenshot-related issues.
- Reset Screenshot Preferences: If you’re experiencing persistent issues with the Screenshot app, you can reset its preferences by deleting the corresponding plist file. Be sure to back up any custom preferences before doing so.
Mastering the art of taking screenshots on your MacBook Pro is a valuable skill that can enhance your productivity and communication abilities. By familiarizing yourself with the various screenshot methods, exploring customization options, and troubleshooting common issues, you’ll be equipped to capture and share visual information effortlessly. Practice regularly and experiment with different techniques to discover the screenshot workflow that works best for you.
Advanced Screenshot Techniques and Customization
Once you’ve mastered the basics of taking screenshots on your MacBook Pro, it’s time to explore advanced techniques and customization options to further enhance your screenshot workflow.
Automate Screenshot Tasks with Automator:
If you frequently perform specific screenshot tasks, such as capturing screenshots at regular intervals or resizing and saving screenshots in a particular format, you can automate these tasks using the Automator app.
- Launch Automator from the Applications folder.
- Create a new Workflow.
- Drag and drop actions from the library to create your custom screenshot automation workflow.
- For example, you can add actions to take screenshots, resize images, and save them to a designated folder automatically.
Once you’ve created your workflow, you can save it as an application or a service, making it easily accessible whenever you need to perform those tasks.
Capture Screenshots with Terminal Commands:
For users comfortable with the command line, macOS offers terminal commands to capture screenshots programmatically, providing more flexibility and customization options.
- Open Terminal from the Applications folder or using Spotlight search.
- Use the screencapture command followed by various options to capture screenshots.
- For example, screencapture -i ~/Desktop/screenshot.png captures a screenshot of a selected portion and saves it to the Desktop as a PNG file.
By utilizing terminal commands, you can integrate screenshot capture into scripts or workflows, automate repetitive tasks, and customize the capture parameters according to your requirements.
Share Screenshots Directly from macOS:
macOS offers built-in options for sharing screenshots directly from the screenshot preview window or the Screenshot app, streamlining the process of sharing visual information with others.
- After capturing a screenshot, click on the thumbnail preview that appears in the bottom-right corner of the screen.
- From the preview window, you can annotate the screenshot using Markup tools and share it via AirDrop, Messages, Mail, or other compatible apps.
This feature eliminates the need to save screenshots as files and manually attach them to emails or messages, saving time and simplifying the sharing process.
Customize Screenshot File Names and Formats:
By default, macOS assigns generic names (e.g., “Screenshot [date]”) to screenshots and saves them in the PNG format. However, you can customize the naming convention and file format according to your preferences.
- In the Screenshot app or Preview, go to Preferences and navigate to the “Options” tab.
- Here, you can customize the file name format by including variables such as date, time, or screen dimensions.
- Additionally, you can choose the desired file format (e.g., PNG, JPEG, TIFF) for saving screenshots.
Customizing file names and formats can help you organize and identify screenshots more effectively, especially when dealing with a large volume of captured images.
Utilize Third-Party Screenshot Apps:
While macOS offers robust built-in screenshot tools, third-party screenshot apps provide additional features and customization options for users with specific requirements or preferences.
- Apps like Snagit, Skitch, and LightShot offer advanced annotation tools, cloud integration, and workflow automation features.
- Explore the Mac App Store or third-party software websites to find screenshot apps that meet your needs.
Third-party screenshot apps can complement macOS’s native capabilities, allowing you to further optimize your screenshot workflow and productivity.
By exploring advanced screenshot techniques and customization options on your MacBook Pro, you can elevate your screenshot workflow to new heights of efficiency and productivity. Whether you’re automating repetitive tasks, customizing capture parameters, or leveraging third-party apps for additional features, there’s no shortage of ways to enhance your screenshot experience on macOS. Experiment with different methods, tailor them to your specific requirements, and enjoy the seamless process of capturing and sharing visual information on your MacBook Pro.